Without a charge controller, your house battery won’t be able to directly use the sunlight energy from your solar panels. A charge controller is needed to convert this energy into usable electricity, as well as distributing the current and voltage supplied by your solar system in the most productive way.
This way, the best RV solar charge controller allows you to get the most available power while maximizing your battery health and lifespan.
Selecting the best RV solar controller for your particular energy requirements does require knowledge and special care, as different types of solar charge controllers might be suitable for solar systems of different sizes, for different battery setups and different power needs. There are also numerous technical specifications and terms.
But worry not, as you will definitely find something in this RV solar controller reviews of the 10 most reliable and reasonably priced units on the market.
For the novice, technical specifications and crucial buying criteria will be explained in beginner friendly terms, and you will also find useful tips for installing, testing and using solar charge controllers.
Contents
- Quick Recommendations
- Why You Need A Solar Charge Controller
- 10 Best RV Solar Charge Controllers: In-depth Review
- 1. Best Overall MPPT Controller: RICH SOLAR 40 Amp 12V/24V DC Input MPPT Solar Charge Controller
- 2. Best MPPT Controller For Large Solar Systems: OUTBACK POWER 80AH FM80 MPPT Controller
- 3. Most Affordable 4-Stage Charging MPPT: EPEVER 30A 12V 24V MPPT Solar Charge Controller
- 4. Best High Voltage MPPT: Victron SmartSolar 75 Volts 15 Amps MPPT Charge Controller with Built-in Bluetooth
- 5. Best Overall PWM: Renogy Wanderer Li 30A 12V PWM Negative Ground Solar Charge Controller
- 6. Best 4-Stage Charging PWM: Go Power! By Valterra GP-PWM-30-UL 30A Solar Charge Controller
- 7. Most Affordable High Amp PWM: EEEkit 12V/24V 30A PWM Solar Charge Controller
- 8. WindyNation P30L LCD 30A PWM Solar Charge Controller
- 9. HQST 10Amp 12V/24V PWM Solar Charge Controller
- 10. GHB 20A 12V 24V PWM Solar Charge Controller
- Types of Solar Charge Controller
- Criteria For Selecting A Solar Charge Controller
- How To Install and Test An RV Solar Charge Controller
- RV Solar Charge Controllers FAQs
Quick Recommendations
- Best Overall MPPT Controller: RICH SOLAR
- Best MPPT Controller For Large Solar Systems: OUTBACK POWER
- Most Affordable 4-Stage Charging MPPT: EPEVER
- Best High Voltage MPPT: Victron SmartSolar
- Best Overall PWM: Renogy Wanderer Li
- Best 4-Stage Charging PWM: Go Power! By Valterra GP-PWM-30-UL
- Most Affordable High Amp PWM: EEEkit
Why You Need A Solar Charge Controller
If you install solar panels without a charge controller, your house battery won’t be charged, and the appliances inside your RV will receive zero electricity.
This is because the type of energy that solar panels can produce from sunlight is different from the DC power that your house battery and appliances need. A solar charge controller is needed for converting this energy from the sun into usable DC energy.
The best solar charge controller for RV can do much more than just energy conversion. It’s fair to say that the charge controller is the heart of your solar energy system, which you will see in a minute.
It ensures that your house battery is charged in the most efficient way and is protected from unwanted circumstances, and allows you to get the most from your existing solar system, so that you can power more appliances for longer with minimal electricity wasted.

These are the benefits of a solar charge controller:
Efficient Charging For Optimal Battery Health and Lifespan
The best charge controller can roughly measure how much power is stored in the battery at a given time and accordingly adjust the charging amperage for the most efficient multi-stage charging. This will allow for optimal battery performance and lifespan.
A solar charge controller allows for three stages of charging to take place. The first stage is bulk charge, where a deeply discharged battery receives high current to quickly replenish to around 80 percent of its capacity.
Once the battery has reached a set voltage, the second stage begins. In the absorption phase, the charge controller will maintain a slower charge rate to continue charging the battery to full capacity.
Once full capacity is reached, in the float stage, the batteries will receive a trickle charge to maintain this full state of charge, that is the battery will be charged at a rate equal to its self-discharge rate.
Protection From High and Low Voltages
The best RV solar charge controller not only adjusts the amperage but can also regulate the voltage coming from your solar panels as well. This is crucial due to the nature of solar energy.
The amount of sunlight your solar panels receive can vary widely depending on time of day and season as well as your altitude. As a result, there will be times when your solar panels produce more energy than your battery needs. Too much power or a sudden surge of supply can overcharge your battery at a high voltage and overheat it, which is detrimental to the battery’s health and lifespan.
A 12-volt battery should be charged at around 13.8 volts or no more than 14.4 volts, while during peak sunlight, a solar array that’s directly connected to the battery can produce an output of 21 volts, which is too high to be healthy for the battery.
In contrast, there will also be times when there’s so little sunlight that your RV solar panels won’t be able to produce enough electricity to charge your RV battery to a full charge. If a deep cycle house battery is repeatedly depleted to too low a discharge rate, particularly below 50 percent of capacity, its lifespan will be shortened.
To avoid the negative effects of both overcharging and undercharging, a good charge controller works to regulate the flow of both voltage and current, so that the battery will receive the right amount of power that would be healthiest for it at any given time.
Blocking Reverse Current
Reverse current is an occurrence that happens at night, when your solar panels may pass a bit of current in the reverse direction, that is from the battery back to the panels, thus causing a small discharge from the battery.
To prevent this, a unit might feature a semiconductor which acts like a valve.
This semiconductor will only let currents pass in one direction from the solar array to the battery.
10 Best RV Solar Charge Controllers: In-depth Review
If you have already determined the most suitable type of solar charge controller as well as what you need from your unit in terms of capacity and features, you can quickly choose among the 10 most well rounded units below.
All are guaranteed to keep your battery optimally charged for a longer life while efficiently producing energy to keep more appliances powered.
Otherwise, skip to the next section to learn the most important criteria for selecting the most suitable charge controller for your specific circumstances, including how to calculate the minimum capacity you would need from your ideal charge controller.
1. Best Overall MPPT Controller: RICH SOLAR 40 Amp 12V/24V DC Input MPPT Solar Charge Controller

Specifications:
- Type: MPPT
- Battery types: flooded lead acid, AGM, gel and lithium ion batteries
- Voltage: 12/24 volts
- Amperage: 40 amps
- Features: 3-stage charging, battery temperature sensor, remote monitoring, adjustable voltage set point
- Safety features: temperature compensation, overcharging, over-discharging, short-circuit, reverse polarity and overload protection
Why we love it:
In the under $200 price range, this best selling 40 amp MPPT charge controller is probably the best RV solar charge controller you will find. Apart from its well rounded functionality and durable construction, one thing that’s extra special about this unit is that it is compatible with not only flooded lead acid, AGM and gel batteries but also with lithium ion batteries. Solar charge controllers that work with lithium ion batteries belong to the minority.
With this solid charge controller in place, you will enjoy more available power, as the MPPT technology will convert excess voltage into amps. This unit claims to have a conversion efficiency of up to 98 percent, and I find this to be realistic. Your battery will be replenished properly without the risk of overcharging or undercharging, thanks to the efficient 3-stage charging model. These are the two merits that made this charge controller a long standing best seller in this market.
This fantastic charge controller comes with all the necessary safety features, plus Bluetooth-enable remote monitoring using an accompanying app. Other useful features include battery temperature sensor and temperature compensation. These two features let the unit charge the battery at higher voltages when the battery is cool, and reduce the charging voltage when it detects that the battery is warm, thus preventing overheating. Or you can set the charging voltage thanks to the adjustable voltage set point function.
This charge controller is not only fully functional and reliable over the long run but is also made to last, thanks to the substantial overall construction and the die-cast aluminum design that allows for efficient heat dissipation.
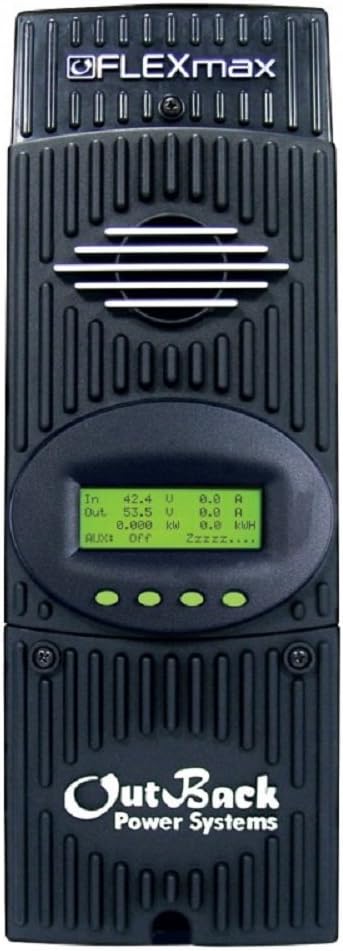
2. Best MPPT Controller For Large Solar Systems: OUTBACK POWER 80AH FM80 MPPT Controller
Specifications:
- Type: MPPT
- Battery type: flooded lead acid, gel, AGM and lithium ion batteries
- Voltage: 12, 24, 48 or 60 volts
- Amperage: 80 amps
- Operating temperature: -40°C to 60°C
- Notable features: 4 stage charging, stores 128 days of data, minimum 98 percent conversion efficiency
- Safety features: overcharging, over-discharging, short-circuit, reverse polarity, reverse current and overload protection
- 5 year warranty
Why we love it:
At north of $500, this is among the most expensive solar charge controllers out there, but if you have an extra large solar system of over 1,000 watts to power your luxury Class A motorhome that’s equipped with power hungry appliances, you will not find a more perfect unit than the OUTBACK POWER 80AH MPPT controller.
This controller is compatible with all types of deep cycle battery, including lithium ion batteries, and works with 12, 24, 48 as well 60 volt batteries. It’s among the rare offerings that come with a 4 stage charging model with the extra equalization mode, so you will notice how it is capable of keeping your large and expensive battery bank healthier for longer.
This is the most reliable solution for large solar setups of up to 1,000 watts for 12V systems, 2,000 watts for 24V systems, and 4,000 watts for 48V systems. This charge controller is capable of outputting 80 amps, and its MPPT technology would convert any excess voltage to more amps, so that you will get the most out of the electricity your solar array produces with minimal power loss.
It has a conversion efficiency of over 98 percent at all times, so negligible power loss over the long run. Trust the words of thousands of full-time travelers who own luxury Class A and Class C motorhomes who have at least ten 100 watt solar panels installed: this high performance charge controller will give you the most available power to run all the power-hungry residential appliances in these luxury RVs.
In addition, an extremely useful feature for full-time campers who wish to be energy self-sufficient over the long term is that this fully functional charge controller can store 128 days of data. This includes all the information you need to track your energy production and consumption: amp hours, watt hours, accumulated amp hours, kWh of production, peak watts and peak amps, voltage produced by the solar panels, battery’s min and max voltage, time in float charge and absorption charge.
Last but not least, this absolutely perfect charge controller packs all the desirable safety features to protect your expensive solar setup and comes with a 5 year warranty. In short, if money is not an issue, I guarantee that this is the best RV solar charge controller that will give you the best value for your money in the long run.
3. Most Affordable 4-Stage Charging MPPT: EPEVER 30A 12V 24V MPPT Solar Charge Controller

Specifications:
- Type: MPPT
- Battery types: flooded lead acid, AGM, gel and lithium ion batteries
- Voltage: 12/24 volts
- Amperage: 30 amps
- Notable features: 4 stage charging, overheating-resistant construction, Bluetooth-enabled remote monitoring
- Safety features: overcharging, over-discharging, short-circuit, reverse polarity, reverse current and overload protection
Why we love it:
If you don’t have an extra large solar system, this EPEVER 30 amp MPPT charge controller would be the best substitute for the previous perfect controller from OUTBACK POWER at just under $150. Like the OUTBACK POWER MPPT controller, it also supports 4 stage charging, is compatible with all types of deep cycle batteries, including lithium ion batteries, although it only supports 12 volt and 24 volts batteries. Rated at 30 amps, it is sufficient for handling a 400 watt solar setup.
This fully functional unit also boasts a die-cast aluminum design, which allows for efficient heat dissipation and thus a longer service life. 24/7 remote monitoring of your power system is bluetooth-enabled on your laptop or the accompanying app on your smartphone.
4. Best High Voltage MPPT: Victron SmartSolar 75 Volts 15 Amps MPPT Charge Controller with Built-in Bluetooth

Specifications:
- Type: MPPT
- Battery types: flooded lead acid, AGM, gel batteries
- Voltage: 75 volts
- Amperage: 15 amps
- Notable features: built-in Bluetooth
- 5 year warranty
Why we love it:
The Victron SmartSolar MPPT charge controller is a tried and tested model that has a stellar 4.7 stars rating from over 2,000 happy buyers on Amazon alone. At below $150, it is quite a steal considering how reliable it is.
With capacity ratings of 75 volts and 15 amps, this charge controller can comfortably handle an array of two 12-volt 100-watt solar panels wired in a series. Some might think 75 volts might be an overkill, but remember that this is an MPPT unit, so it can convert excess voltage to amp to harvest every drop of power from your solar array to charge your house battery and power your appliances.
I can’t be happier with this affordable yet reliable solar charge controller. It kept my battery bank topped off and gave me enough electricity to use everything that I need. I have a battery monitor that tells me my battery’s state of charge, and it never dropped below 50 percent. If you like to boondock somewhere with plenty of sunlight, this charge controller might be sufficient for smaller rigs with moderate power needs.
A handy feature is Bluetooth connectivity that allows you to remotely monitor your entire solar system, so during short camping trips away from your RV, you can still check if your battery is properly charging. Seriously, for the price, it’s hard to go wrong with the Victron SmartSolar.
5. Best Overall PWM: Renogy Wanderer Li 30A 12V PWM Negative Ground Solar Charge Controller

Specifications:
- Type: PWM
- Battery types: flooded lead acid, AGM, gel and lithium ion batteries
- Voltage: 12 volts
- Amperage: 30 amps
- Notable features: Bluetooth-enable remote monitoring, 3-stage charging
- Safety features: overcharging, short-circuit, reverse polarity and reverse current protection
Why we love it:
If you just urgently need something that does the job at low cost and allows some degree of power loss, Renogy has the best PWM charge controller, the Wanderer Li 30 amp. It works with all types of 12 volt deep cycle batteries, including flooded lead acid, AGM, gel and lithium ion batteries. It’s very hard to find a reliable PWM charge controller that is compatible with lithium ion batteries, so this is quite a steal.
As for functionality, to be honest, I wasn’t expecting much considering that this unit costs less than $50. But after a while, you will see why this is a best seller among PWM charge controllers on the market.
With a rating of 30 amps, this charge controller can handle a 400 watt solar system. And while a certain amount of voltages produced by your solar array will be lost since it’s a PWM unit, your expensive battery bank will be charged with the most efficient 4 stage charging model, while the majority of solar charge controllers out there only offer a 3 stage charging method.
In addition to the bulk, boost and float modes, this charge controller also allows for the fourth mode, namely equalization. It is a periodical controlled overcharged and is a means of battery maintenance to make sure all the cells of a battery have the same charge. Equalization is required for flooded lead acid batteries, and sometimes are recommended for AGM and gel batteries.
The equalization mode will act as an extra layer of protection that will keep your expensive battery bank healthier for longer. In addition, this charge controller also packs overcharging, short-circuit, reverse polarity and reverse current protection. Another handy feature is Bluetooth-enable remote monitoring via a smartphone app.
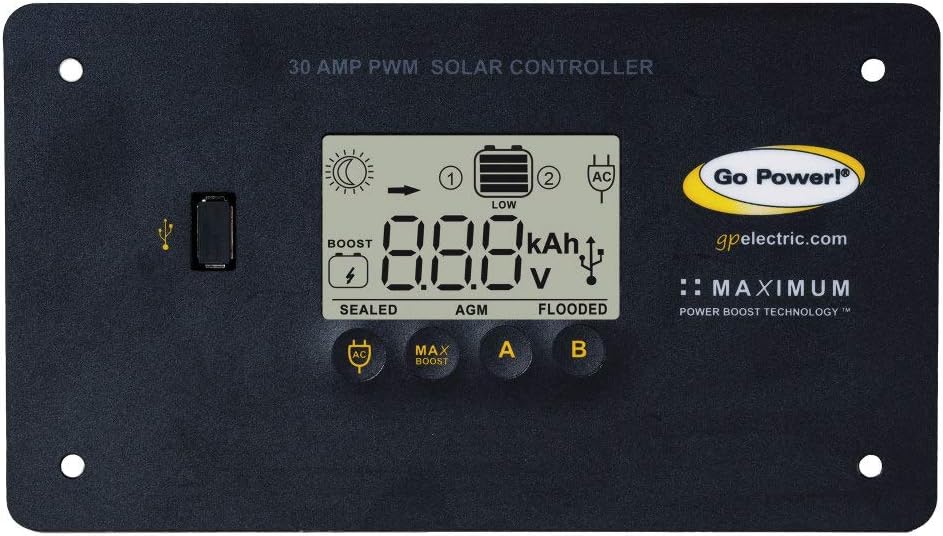
6. Best 4-Stage Charging PWM: Go Power! By Valterra GP-PWM-30-UL 30A Solar Charge Controller
Specifications:
- Type: PWM
- Battery type: flooded lead acid, gel, AGM and lithium ion batteries
- Voltage: 12/24 volts
- Amperage: 30 amps
- Notable features: 4 stage charging
- Safety features: overcharging, short-circuit, reverse polarity, and overload protection
Why we love it:
Like the previous Renogy best seller, this PWM charge controller also works for all types of lead acid batteries, including lithium ion batteries. Although it is more expensive, at north of $200, its price is well justifiable with its merits. Firstly, this controller has connections for a second battery, so you have more versatility as to increase the size of your power setup should your energy demand grow in the future.
Secondly, it is engineered for the optimal 4 stage charging model that not only charges your house battery in the most efficient and safe manner, but the fourth stage, namely equalization, will also condition your battery for better performance and lifespan.
Another feature I find absolutely handy is that this unit displays the voltage and amperage that your solar array outputs to your battery and the battery’s percentage of charge for easy monitoring. This charge controller will be a reliable solution for solar arrays of up to 560 watts.
7. Most Affordable High Amp PWM: EEEkit 12V/24V 30A PWM Solar Charge Controller

Specifications:
- Type: PWM
- Voltage: 12/24 volts
- Amperage: 100 amps (30 amps and 60 amps also available)
- Notable features: timer, 3-stage charging
- Safety features: short-circuit, open-circuit, reverse polarity and overload protection
- 1 year warranty
Why we love it:
This 12V/24V PWM charge controller from EEEkit is a budget friendly option for first time RV owners or budget campers who do not travel full time. It is very basic and there are shortcomings, but overall it gets the job done at a very low cost. There are three options, 30 amps, 60 amps and 100 amps, all available at $35 and below.
Do note that although the product description says this is an MPPT controller, it is a PWM unit. This means there will be about 20 percent of power loss, which is quite considerable if you travel full time, but it can be allowed if you only camp occasionally in a smaller rig that’s not heavily burdened with too many appliances.
For the price, it’s a huge plus that this charge controller supports 3-stage charging. The major shortcoming for me though is that the display only tells you whether the battery is charging and its current voltage, but there’s no information on the voltage that your solar panels are producing. Other than that, this unit does its job at properly keeping the battery topped off without overcharging and overheating.
The 100 amp unit comfortably handled my 500 watts solar array wired in parallel. I wasn’t pushing the limit of my system, but I don’t think you should when using a basic PWM charge controller like this one.
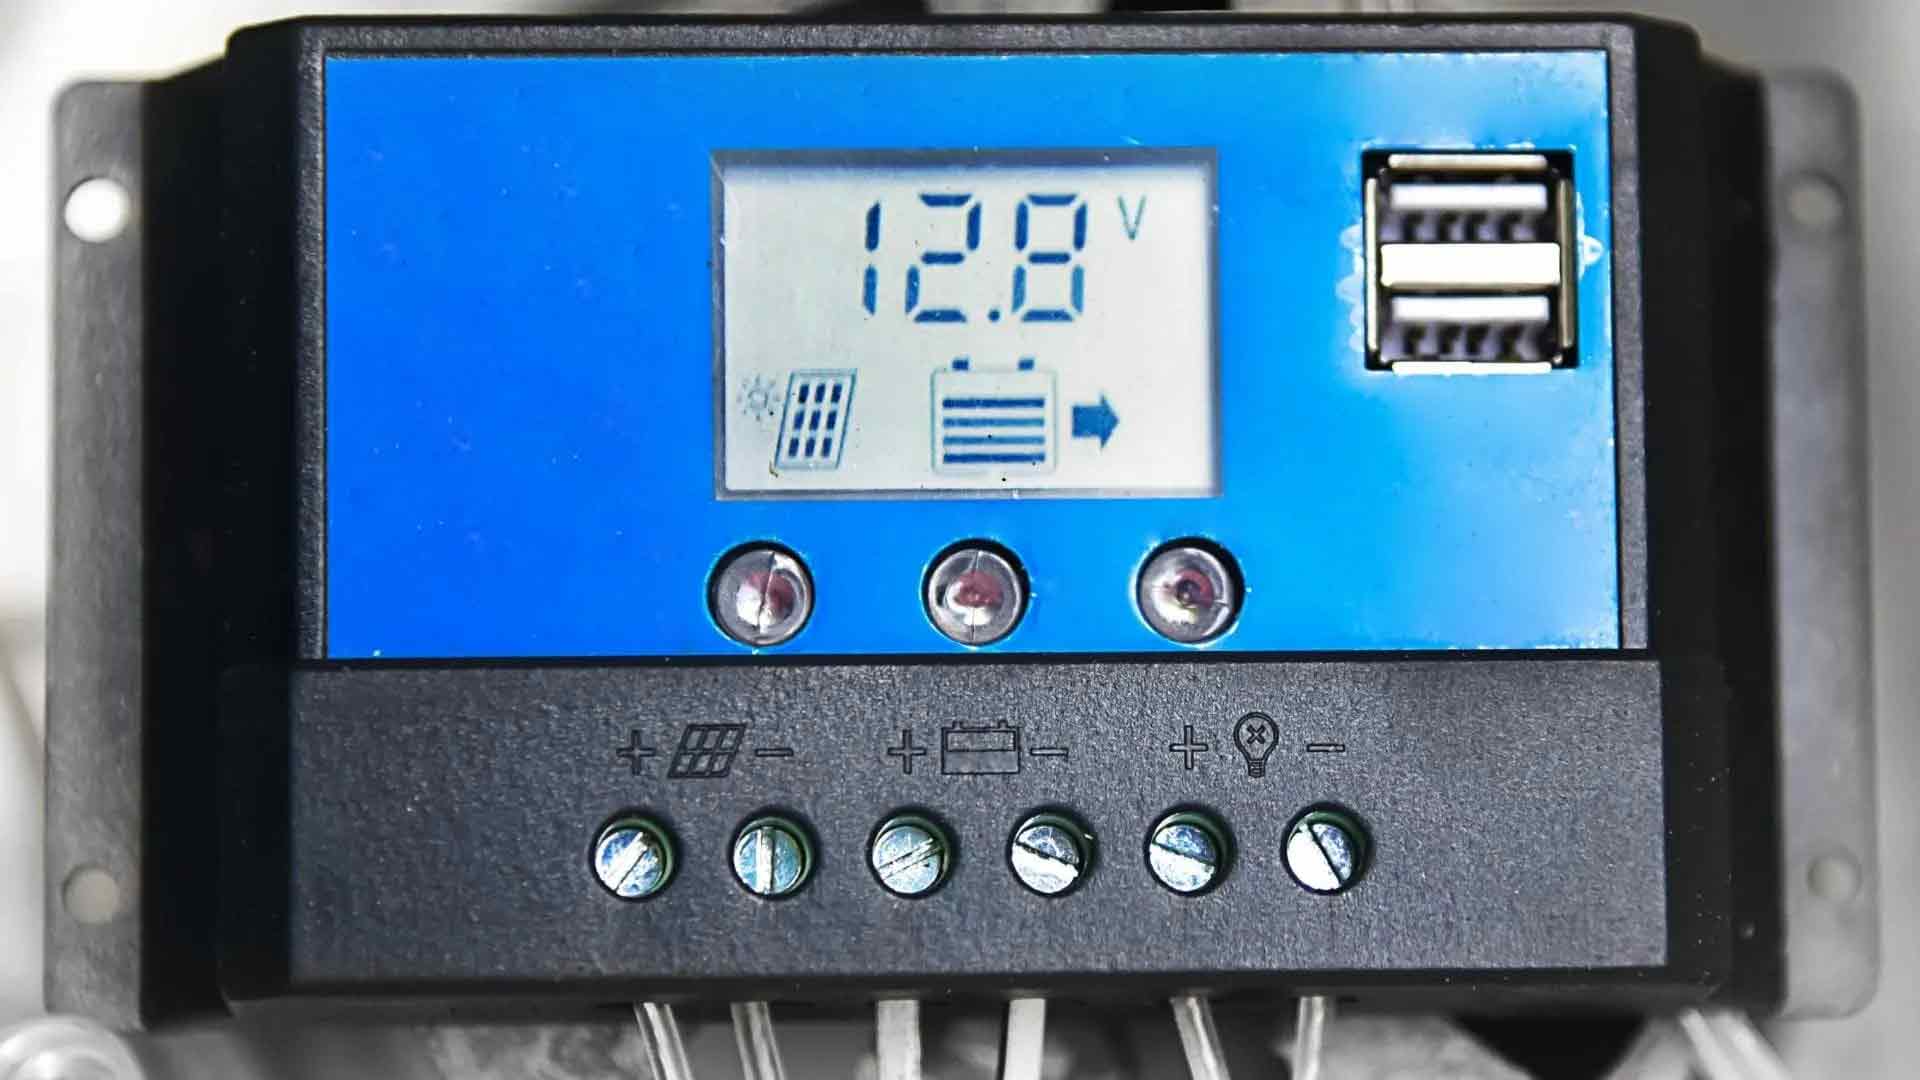
8. WindyNation P30L LCD 30A PWM Solar Charge Controller

Specifications:
- Type: PWM
- Battery type: flooded lead acid, gel and AGM batteries
- Voltage: 12/24 volts
- Amperage: 30 amps (20 amps also available)
- Notable features: battery temperature sensor, adjustable voltage set point
- Safety features: short-circuit, reverse polarity and overload protection
Why we love it:
If you don’t need too many amps, the P30L LCD 30 amp PWM solar charge controller by WindyNation would be a good choice. It costs only a tiny bit more than the previous EEEkit unit, and there are only two options rated at 20 amps and 30 amps, but it tells you the amperage and voltage that your solar array is supplying to the battery. Another handy feature is the battery temperature sensor.
This charge controller can work like a dream with a 400 watt solar setup, which is quite enough for most average camping needs. It is compatible with flooded lead acid, gel and AGM batteries.
The downside is that this is not a three stage charger. You need to set the charging voltage and that is what the battery will charge at, given enough sunlight.
9. HQST 10Amp 12V/24V PWM Solar Charge Controller

Specifications:
- Type: PWM
- Battery type: flooded lead acid, gel and AGM batteries
- Voltage: 12/24 volts
- Amperage: 10 amps
- Notable features: 3-stage charging, USB charging port
- Safety features: overcharging, over-discharging, short-circuit, reverse polarity, reverse current and overload protection
Why we love it:
If you don’t need a high amp rating from your solar charge controller, the 10 amp PWM model by HQST would be the most functional yet most affordable option. It can automatically detect 12 volt and 24 volt batteries, and work with all deep cycle batteries except for lithium ion batteries.
For its price, this unit is fully functional and reliable. It even boasts efficient 3-stage charging that would fully charge your house battery in a shorter time while prolonging battery life. It also packs all the desirable safety features to safeguard your solar investment, including overcharging, over-discharging, short-circuit, reverse polarity, reverse current and overload protection.
It’s understandable that this model is one of the best selling PWM solar charge controllers for first time RV owners and budget travelers with small solar systems. Since this charge controller is most suitable for a 100 watt setup or in other words, for small rigs with minimal energy consumption, it conveniently includes a USB port for directly charging your LED string lights or your personal smartphone and laptop.
10. GHB 20A 12V 24V PWM Solar Charge Controller

Specifications:
- Type: PWM
- Battery type: flooded lead acid, gel and AGM batteries
- Voltage: 12/24 volts
- Amperage: 20 amps
- Notable features: two USB charging ports, temperature sensor and temperature compensation
- Safety features: overcharging, short-circuit, reverse polarity, low voltage, lightning and overload protection
Why we love it:
If you have a 200 watt solar system, look no further than the GHB 20 amp solar charge controller for 12 volt or 24 volt flooded lead acid, AGM and gel batteries.
Handy features include two USB charging ports to directly charge your personal devices, as well as temperature sensor and temperature compensation that together work to adjust charging voltage depending on how cool or warm the battery is to prevent overheating.
In addition to the basic safety features, this affordable PWM charge controller also packs low voltage and lightning protection to safeguard your power system from electrical mishaps.
Types of Solar Charge Controller
Different energy requirements and solar systems of different sizes might require a different type of solar charge controller for optimal power production and efficiency.
To select the most suitable type, you must carefully review your power needs and how likely it is to change in the foreseeable future.
Your chosen charge controller might become obsolete very quickly should your system grow, and you might need to replace your unit too early to make your investment worthwhile. There are four types of solar charge controllers as follows:
Shunt Solar Charge Controllers
Shunt charge controllers are the most basic type of RV solar controller. They are affordable and simple, and might work well for small solar systems. This type of solar charge controller simply stops the charging current when it detects that the battery is sufficiently charged, and starts to supply current again when it detects that the battery is discharged to a certain level.
Specifically, a shunt charge controller will allow current from the solar system to flow to the battery until a set “disconnect voltage” is reached. The solar array will then be short circuited by a transistor or relay, so no more current will flow to the battery.
After a while, the battery voltage will drop until a set “reconnect voltage” is reached. Current is then allowed to flow to the battery again. This is why shunt charge controllers are also called on/off charge controllers.
Do note that as this type of charge controller only has one transistor or relay, it will only charge the battery at a set voltage point. A shunt charge controller is not capable of the efficient three-stage charging model.
The typical disconnect set point for 12-volt lead-acid batteries at 77° F (25° C) is 10.8 volts, while the typical reconnect set point is 12.5 volts.
Series Solar Charge Controllers
A series charge controller also uses a relay or transistor to disconnect and reconnect the solar array with the battery at set voltage points, just like a shunt controller. The difference is that a series charge controller has multiple transistors, which allows for multiple disconnect and reconnect set points. This means a series charge controller is capable of multi-stage charging for the most efficient charging.
Pulse Width Modulation (PWM) Charge Controllers
Pulse width modulation charge controllers are the most common type of solar charge controller on the market these days. They are more efficient than their shunt and series counterparts, yet they are not as recent as the more advanced MPPT type, so they can get the job done in many camping settings at a lower cost.
A PWM solar charge controller will provide enough current that the battery requires for its voltage size. It only supplies enough energy to hit your battery’s voltage requirement and ensures that the battery maintains this voltage point. This means that a PWM solar charge controller works well to prevent overcharging, but this also means that the charge controller will throw away the leftover voltage, or whatever exceeds the battery’s voltage requirement.
If you don’t travel full-time and just need an affordable charge controller that will keep your battery charged efficiently whenever you hit the road as well as maximizing battery lifespan, you might be willing to allow some loss of energy.
Otherwise, if you travel full-time and plan to keep doing so for years to come, such energy loss can accumulate in the long run to be quite substantial. If so, it’s worth it to invest a bit more money to get a good maximum power point tracking charge controller that will minimize power loss.
Maximum Power Point Tracking (MPPT) Charge Controllers
Unlike a PWM solar charge controller, the best MPPT charge controller doesn’t throw away excess voltage but redistributes it in a way that’s most efficient.
For instance, during peak sun, your solar array might produce 18 volts of power. Your MPPT charge controller will only supply 13.8 volts to your battery to charge it, which is healthier, and convert the remaining 4.2 volts into more amps, thus increasing the amps flowing to the battery from, say, 4 amps to 8.2 amps. This will allow your battery to get the most from the solar array’s available power while preventing overcharging and overheating.
Another way to look at this is that an MPPT solar charge controller can adjust the input voltage of the solar system to achieve the “maximum power point” at which the system produces the most available power, thus the name “maximum power point tracking”.
Each solar panel has a different maximum power point at which voltage and current peak. An MPPT charge controller is engineered to detect this point and adjust accordingly to achieve the highest power output.
The best MPPT solar charge controller may let almost no energy produced go to waste. Their average conversion rate may reach as much as 99%, while the rate of most PWM controllers range between 75% and 80%, that is a ⅕ to ¼ loss of power produced.
This smart capability for optimal efficiency makes MPPT the highest performance units for larger solar arrays that can potentially waste more energy, larger rigs that have a lot of appliances to power and campers who travel in a group. In these cases, the more energy available at any given time, the better.
While a PWM charge controller only costs below $200, a good MPPT charge controller will cost at least $250 all the way up to $700 depending on the power rating and other additional features. Depending on your requirements and how often you camp, the extra investment might be well worth it in the long run.
Criteria For Selecting A Solar Charge Controller
There are a number of technical specifications you need to understand and consider in relation to your power requirements. Below are the most crucial criteria, in order of importance:
Voltage
Your ideal solar charge controller in any case must first have sufficient capacity to handle the amount of voltage and current produced by your RV’s solar system. While a solar charge controller might have a voltage rating of anywhere between 6 and 60 volts, the most common ratings are 12 volts, 24 volts and 48 volts.
If your solar system expands and your existing charge controller can no longer handle the now larger output, you can wire more than one charge controller in parallel to the same battery bank. A parallel connection will keep the amperage unchanged while increasing the total voltage of the setup. If you currently have one 12 volt charge controller but now need 24 volts, just add one more 12 volt charge controller of the same model in a parallel connection.
Amp Rating
The second element of a charge controller’s capacity is its amp rating, which refers to the highest amperage the controller can output to the batteries. Most solar charge controllers can provide the battery with a charge of between 10 and 90 amperes.
To calculate the minimum amp rating you need from your charge controller, given that you have a 12-volt battery bank, the rule of thumb is you would need at least 7.5 amps for every 100 wattages from your solar system.
Example #1: For example, if you have two 100 watts solar panels, or a total of 200 watts, you would need a charge controller with an ampere rating of at least 15 amps. The rule is to always round up to the next common size, as you never want to cut it too close when it comes to your precious battery. So a 20 amp charge controller would be the smallest size you should get for your system.
If you think your power requirements are likely to increase in the foreseeable future, you might want to upgrade to a 30 amp charge controller. This will allow you to add another 100 watt panel to your system later on if you find you’re not getting as much sun as expected.
Example #2: Here’s another way for calculations. Let’s say your solar array has an amperage rating of 20 amps. Then you would need a charge controller rated at 20 amps at a minimum. Anything lower is suboptimal, as your solar system would produce 20 amps when your charge controller can only supply, say, 15 amps to your battery, while the remaining 5 amps would end up being wasted.
20 amps is your solar panel’s peak power level, but the best practice is to add 25 percent on top as a safety cushion. This would bring the minimum amps rating for your ideal charge controller up to 25 amps. As always, round up to the next common size, so you should get a unit with a 30 amp rating.
Adjustable Charging Voltage Point
As noted above, an efficient solar charge controller should allow for multi-stage charging, in which the battery is charged at a different charging voltage in each charging stage for optimal efficiency.
These voltage points differ among different battery types. Therefore, a charge controller with adjustable charging voltage points should have a means to select the type of battery it is regulating, that is flooded lead-acid, gel or AGM batteries. This feature will keep your battery bank healthy for a longer time. Check the manuals for your battery or contact your battery manufacturer to know what voltage is right for your battery at each charging stage.
Safety Protection
1. Low Voltage Disconnect
Most charge controllers have three sets of positive and negative terminals. One set is connected to the solar array, while another goes to the battery, and the last is a load connection. It usually says “LOAD” or “LVD”, which stands for low voltage disconnect.
This is an important feature for battery protection. The load connection is connected to a fuse box that is in turn connected to all of your electrical appliances, and is meant to power these devices through the charge controller. If the battery’s voltage drops below a set point, the solar charge controller will cut power to the fuse box to prevent further draining of your batteries.
This prevents frequent deep discharges, thus maximizing your battery health and lifespan. Some models are even smarter and can adjust this low voltage disconnect point if it detects that your batteries aren’t getting full charged daily.
2. Overload protection
A circuit is overloaded when the current flowing in it is higher than it can safely handle. This results in overheating and can become a fire hazard. To prevent overloading, look for a controller that has built-in overload protection, usually with a push-button reset.
An important note is that even with such a feature in place, you will still need to check your manual to see whether your system would still require additional protection in the form of fuses or circuit breakers.
3. Battery Temperature Sensor
Another handy safety feature is a built-in temperature sensor, which detects the temperature of the battery and adjusts the charging voltage accordingly.
The ideal voltage set points for a solar charge controller vary with a battery’s temperature. When the charge controller senses that the battery is cool, it will raise the charging voltage. In contrast, when the battery is warm, it will reduce the charging voltage.
The purpose is to avoid overheating. Overheating is detrimental to battery health and lifespan, as it may result in rapid sulfation and excessive loss of distilled water in flooded batteries.
Handy Features
The above three safety features are the most crucial ones that your solar charge controller should offer. In addition, there are other nice-to-have features that would help you get the most out of your solar setup.
On/off switch: An on/off switch would keep your charge controller independent from your solar system and allow you to shut down everything without having to remove the fuse or hit the breaker.
Dry camp/ Shore power switch: Some RV solar charge controllers have a special switch to change the battery’s charging voltage points between maximum power during off-grid trips and standby mode when you are plugged into shore power at a campground. In the “dry camp” mode, your battery will receive more power to be able to reach full charge, as you’re not plugging into shore power. Meanwhile, in the “shore power” mode, as you’re plugged into shore power, your battery will only be charged at a lower voltage that’s just sufficient to help it maintain its state of full charge.
Displays: The best RV solar charge controller should be user-friendly in the way that it can display various indicators of your battery and solar system. Useful readings include the flow of power into and out of the system in voltage and current, your battery’s state of charge, battery temperatures , and when voltage set points are reached.
Amp-hour meter: An amp-hour meter will keep track of the energy available in your battery at any given time, thus allowing for more accurate battery monitoring. This is an extra, but you won’t need it if you already have a power meter that can measure amp-hour.
You may also like: Best Flexible Solar Panels for RV
How To Install and Test An RV Solar Charge Controller
Installing A Solar Charge Controller
Each kit might differ slightly, but the general process should look something like this:
- Mounting the charge controller: Firstly, find a place to mount your solar charge controller. Install the controller as close to the batteries as possible but still provide enough room for heat dissipation and off-gassing from the battery. Mounting your charge controller closer to the battery will reduce current loss and allow the controller’s built-in temperature sensor to accurately report the battery’s temperature.
- Connect the charge controller to the battery: Do this before connecting the charge controller to the solar panels. If needed, use a multimeter or voltmeter to test your wire polarity and mark them. Make sure to fuse the positive wire close to the battery so any system short circuit won’t start a fire.
- Connect the charge controller to the solar panels: There’s a reason why you must always connect the charge controller to the solar panels last. The moment your solar panels are exposed to sunlight, they will start producing power, and you wouldn’t want current running from the panels into the controller with nowhere to go. You will need to run the power cables from the solar array into the RV through a drilled hole or refrigerator vent.
- Protection against faulty controllers: Check if your solar charge controller has an external chassis ground terminal. If so, run a separate wire from this directly to your RV chassis. When there is an internal fault inside the charge controller, this setup would allow electricity to still have a path back to the battery to properly pop the fuse.
Testing A Solar Charge Controller
To test if your newly installed solar charge controller functions properly, you will need sunlight and a multimeter that can measure voltage and current.
But first, there are preliminary checks you must always perform to ensure safety:
- Cover the front of the solar panels, as they produce electricity whenever exposed to sunlight.
- Make sure all wirings are correct.
- Check all connections and terminals for good electrical contact.
- Make sure the fuses are not blown.
Then, you will need to measure operating current using a multimeter before actually testing if the charge controller works:
- Make sure the multimeter is set to measure DC amps and set it at 10A to start with.
- Disconnect the positive cable between the charge controller and the battery.
- Connect the positive cable from the controller to the “+ve” on the multimeter, and the positive battery terminal to the “-ve” on the multimeter. This measures the operating current that the solar panels and charge controller are supplying to the battery.
- Troubleshooting: If you get a negative number, it means you have connected the multimeter the wrong way round. If you get zero or a close to zero reading, it means the battery is full, so it cannot accept more current.
Then, to test if the solar charge controller works properly:
- Re-connect the solar panels directly to the battery without the charge controller.
- Disconnect the positive cable between the solar array and the battery.
- Measure the operating current again with the multimeter: connect the positive cable from the solar array to the “+ve” on the multimeter, and the positive battery terminal to the “-ve” from the meter.
- The multimeter should detect no current without the controller.
Troubleshooting: If there was no current in step 2, but there is now current in step 3 without the controller, there are two possibilities:
- Either the charge controller is faulty or
- The most common problem is lack of solid electrical contacts at the charge controller terminals. Check for loose cable connection, and try to disconnect and re-attach the cables.
RV Solar Charge Controllers FAQs
Which is the best RV solar charge controller, PWM or MPPT?
Overall, MPPT charge controllers perform better than PWM units, but performance should be considered in relation to price and your power needs. PWM charge controllers are more affordable than MPPT models, so if you are a first time RV owner or a budget camper who needs a robust charge controller for less sophisticated energy requirements, a PWM unit might make a more sensible investment.
Otherwise, if you are willing to pay extra for minimal energy loss, an MPPT solar charge controller would clearly be the most functional choice. Here’s a detailed comparison:
Charging Stages: Both PWM and MPPT charge controllers charge the house battery in three stages: bulk, float and absorb.
Energy Loss: When your solar system produces more voltage than your battery requires, say 16 volts, a PWM charge controller only supplies 13.8 volts to the battery, which is healthier for it to consume, and throws away the remaining 2.4 volts.
Meanwhile, after supplying 13.8 volts to the battery, a MPPT charge controller will convert the remaining 2.4 volts to amps, thus allowing your battery to get the most available power. In other words, a MPPT charge controller does not waste any of the electricity produced by your solar panels.
Conversion Rate: Due to a MPPT unit’s unique capability to minimize energy loss, their average conversion rate may reach as much as 99%, while the rate of most PWM controllers range between 75% and 80%.
Expandability: PWM charge controllers can readily support larger solar systems with a total capacity of two kilowatts and over, while MPPT controllers are typically used in systems with a capacity below two kilowatts.
What size solar charge controller do I need?
The “size” of a solar charge controller refers to its voltage and ampere rating. The voltage of a solar charge controller can range from 6 volts to 60 volts, although the most common ratings are 12 volts, 24 volts and 48 volts. A typical solar charge controller can provide a charge between 10 and 90 amperes to the battery banks.
Larger solar systems would require larger charge controllers, so if your system expands, you might need to upgrade to a charge controller with a higher capacity. The rule of thumb is that for 12 volt batteries, your charge controller would need to have at least 7.5 amps of capacity for every 100 wattages of solar power from your system.
For example, if you have two 100 watts solar panels, or a total of 200 watts, you would need a charge controller with an ampere rating of at least 15 amps. The rule is to always round up to the next common size and never cut it too close, so a 20 amp charge controller would be the smallest size you should get for your system. If you think your power requirements are likely to increase in the foreseeable future, you might want to upgrade to a 30 amp charge controller. This will allow you to add another 100 watt panel to your system later on if you find you’re not getting as much sun as expected.
Should I wire my solar panels in series or parallel with a MPPT charge controller?
If you have a MPPT charge controller, wire your solar panels in series. This will increase the total voltage input of the whole system while keeping the amperage unchanged. Series connection is more ideal for MPPT charge controllers as these controllers are able to accept a higher voltage input while efficiently charging 12 volt or larger battery banks.
Furthermore, as MPPT solar charge controllers can convert unused voltages to amps to maximize available power, it’s okay to keep the amperage unchanged. This setup will allow the MPPT charge controller to figure out the most efficient way to distribute power so that you get the largest amount of available power from your solar panels.
To connect solar panels in series, connect the positive terminal of one solar panel to the negative terminal of the next panel and so on. The remaining positive terminal and negative terminal at the two ends of the array will be connected to the terminals of the MPPT charge controller.
Should I wire my solar panels in series or parallel with a PWM charge controller?
If you have a PWM charge controller, it’s best to wire your solar panels in parallel. This will get you more amps at the same voltage. While a PWM charge controller cannot convert unused voltage into amps like a MPPT unit can, a parallel wiring would give you more usable power. Another advantage is that this setup allows each panel to work separately. That is, if one panel is in the shade, the other panels can still produce electricity at maximum capacity.
To connect solar panels in parallel, connect all the positive terminals of all the solar panels together using a Y-branch connector, and all the negative terminals of all the panels together. The other end of the positive Y-branch connector is connected to the positive terminal of the charge controller, and the similar is done for the negative connection.
Where should I mount my controller?
To keep things simple and functional, you should mount your solar charge controller closer to your solar panels and house batteries, especially when your unit has a built-in battery temperature sensor. For this sensor to report the battery’s temperature accurately, the solar charge controller needs to be mounted where the temperature is close to that of the batteries.
Another note is you need to provide enough of a gap for heat ventilation, as the house battery can get pretty warm. This is to also avoid off-gassing from the battery, which might affect a charge controller’s functionality.
Can solar charge controllers be connected in parallel?
Yes, more than one solar charge controller can be connected in parallel to the same battery bank to meet higher energy requirements. Each controller is connected to its own separate subarray of solar panels.
Who makes the best RV solar charge controller?
If you want to buy a tried and tested solar charge controller with lots of reviews from an established manufacturer, the best brands include Renogy, WindyNation, Go Power, EPEVER and HQST.
How long do solar charge controllers last?
Most RV solar charge controllers on the market come with a 5 year warranty. The best RV solar charge controller units can last over 10 years in full operation with proper use, but that also depends on the camping environment.